|
While I’ve always been fascinated with mushrooms, I’ve always erred completely on the side of caution, until a few chances to go mushroom hunting with some seasoned experts changed all that. The way they hide under detritus on the forest floor, sometimes growing directly out of leaves, pine needles, and pine cones is personally a source of delight. They can also be cultivated outdoors, in your yard, increasing the quality of your soil as well as creating new soil, and adding a source of food and compost for you and everything in your garden. Part of our goal in loading a huge amount of fresh wood chip into our yard was for the sake of attracting mycelium, the extraordinarily dense and complex subterranean life form of which mushrooms as we know them are a fruiting body. Mycelium looks like a white, cobweb-like substance, and you’ll often see it naturally forming on the underside of dead leaves or fallen branches in the forest. Many mushrooms ‘digest’ fallen biomass like this, in turn becoming food for insects as they start to rot. In their lifecycle, mushrooms help contribute to the creation of a huge amount of fresh soil. Mycelium has also been positively implicated in the life-cycle of nearby bees, as the sweet smell that many of us think of as a ‘mushroomy’ aroma attracts bees and other insects to this food source. One study demonstrated that bee colonies fed mycelium extract showed significant resistance to deformed wing virus, Lake Sinai virus, and other diseases affecting bee populations. The wood chip has been incorporated into "hugelkultur" mounds, in paths, and as general mulch, and just about everywhere it makes contact with the ground, it is alive with white strand, sometimes forming solid chunks of woodchips. We've seen three different species of wild mushrooms in our yard as a result. You don't have to make it a crapshoot, however, as to what kind of mushrooms you are producing. Indoor mushroom cultivation is known for being at least a little fussy, requiring a high degree of sanitation and sterilization if you’re going to any degree beyond the small tabletop kits of gourmet oyster or shiitake mushrooms you can purchase from various companies. But outdoors, using cardboard, FRESH wood chips and straw and some mushroom spawn from a company like Field and Forest in Wisconsin, you can set up a bed in a shaded area to grow Winecap or Oyster mushrooms on beds. This is our first attempt at doing such a thing, but from what I’ve been reading this method produces delicious edible mushrooms several times a year depending on your climate, using water and the wood chip bed for food. Because mushrooms (the fruits) are something like 90% water, you’ll want the bed to be in a shaded area. WHAT YOU NEED
We set up these beds based on a vague synthesis of techniques from Tradd Cotter’s “Organic Mushroom Farming and Mycoremediation” book, as well as the video from FreshCap Mushrooms in western Canada, on building a straw bed for oyster mushrooms. Tradd Cotter’s technique specifically talks about the Winecap Stropharia mushroom, but later in his book identifies Oysters as a prime candidate for growing outdoors in a garden on fresh wood chips. Tony from FreshCap describes setting up a bed specifically with gray Oyster grain spawn, fresh straw, and a little polypropylene sheeting. I felt as though I had to adapt a little given our current situation (and given one other experiment we tried), so our method straddles the two. If you're looking for other info, just remember the basic terms - Media/Substrate and Spawn. 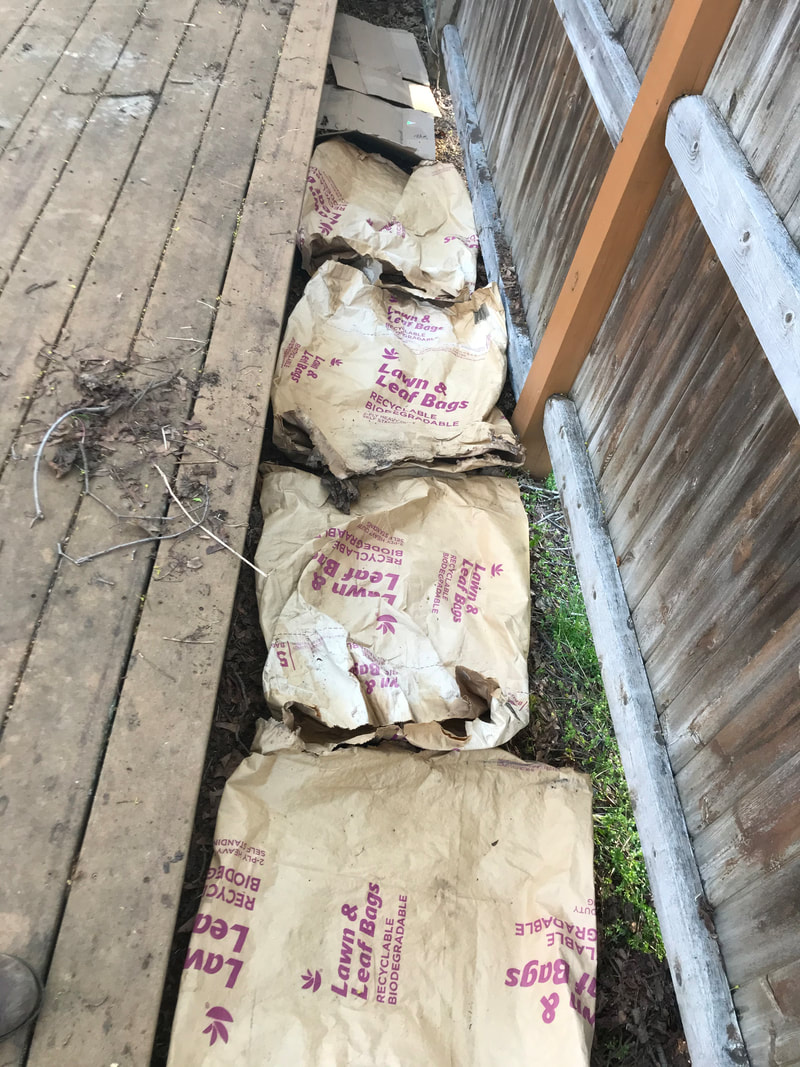 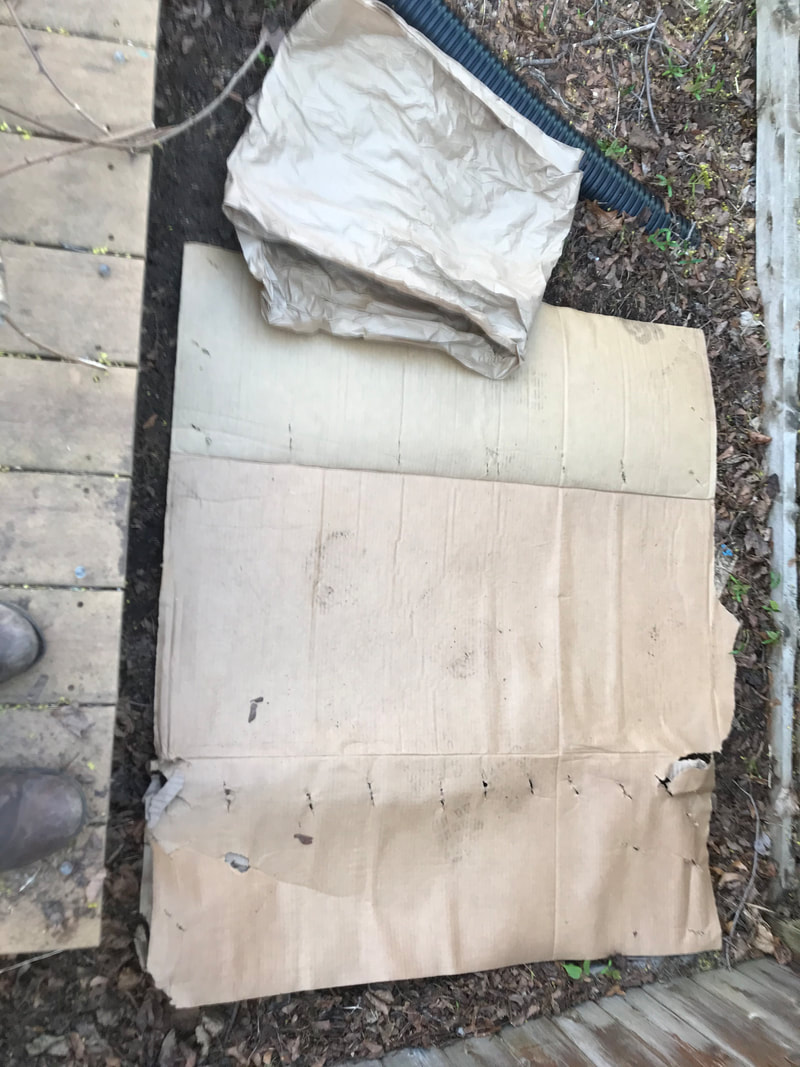 Between our deck and the old yard fence, there is a shady patch and kind of a long trench, both collecting a lot of detritus that has been steadily breaking down. These seemed like good places to try Oyster beds, given the conditions. We started by laying cardboard down. This is in part to prevent other competitor fungi from taking over the wood chips, and also to prevent weeds from growing up through the pile, which they certainly will do without a buffer. (Toward the front of the first photo, it’s old biodegradable leaf bags. These MAY be a gamble because they’ve started to rot a bit - but no visible mycelium on them). 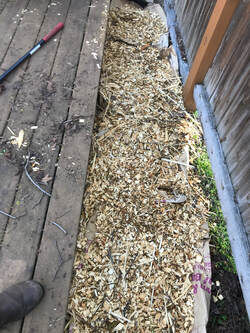 Then sprinkled on a thin layer of mushroom grain spawn. On the long trench, it’s pink oyster grain spawn, a warm-weather variety, and in the rectangular patch, it’s Blue Dove, a trademarked variety from Field and Forest. On top of that, we put a layer of fresh wood chips about 2 inches thick, then some straw, then more grain spawn. We built it up like like a layer cake - with a thin layer of spawn on the bottom, and fresh wood chips and straw on top. For the trench, I used a 4 lb bag of grain spawn in total, and for the rectangular patch, about half of a 4lb bag of grain spawn. There are formulas and ratios that you can follow, but if you don’t know exactly the volume of wood chips you are working with, you may just have to eyeball it. Theoretically, more spawn means higher likelihood of success. It is worthwhile to pick a variety based on the temperature - it may have been too cold at night still to start a pink oyster bed, and those are still going a bit slowly. 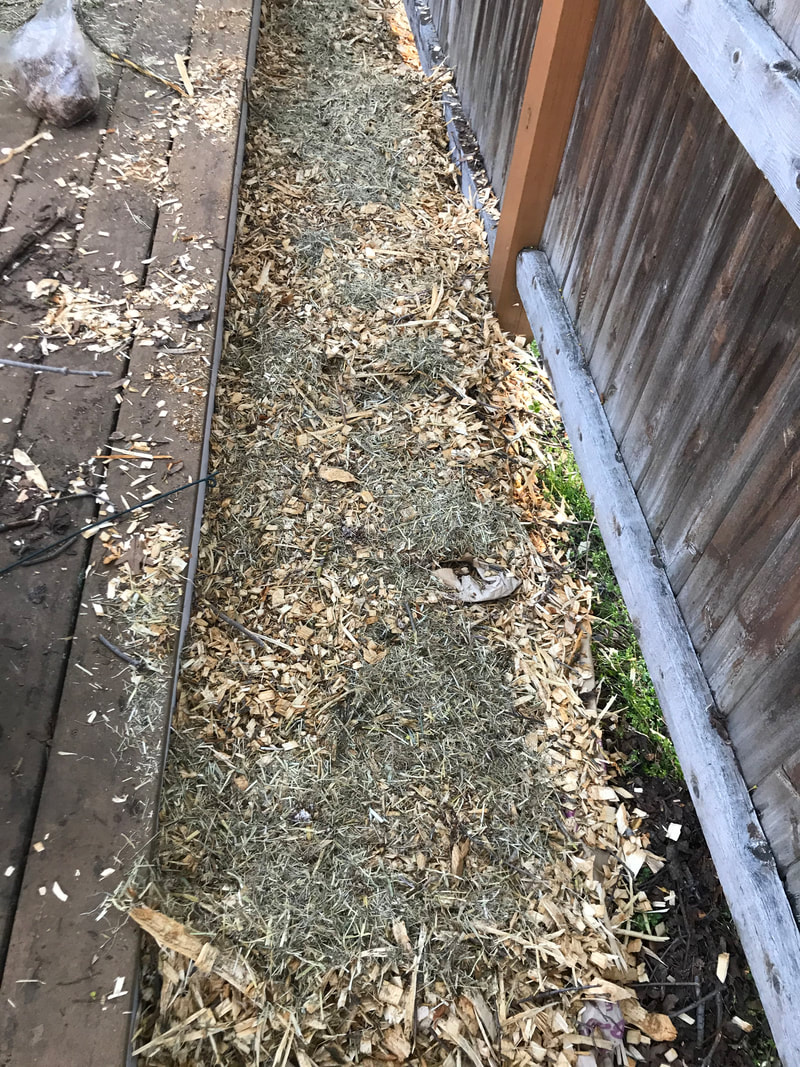 What will success look like? This is called colonization - when the mycelium as a whole takes over a majority of the body of wood chips you’ve set up for it. (Pictured is a bunch of wood chips elsewhere in the yard, colonized with...something else to be determined.)  Interspersing grain spawn among wood chips in this way increases the likelihood that the whole pile will be colonized by the oyster mushrooms we’ve “planted”, as opposed to something else. I plan to water it daily for the first 1-2 weeks, keeping it covered with either a tarp or cardboard - then once weekly for the following month, and finally once monthly. Both wood chips and mycelium retain water quite well, so once these beds are established they will need very little watering for sustenance, unless there’s a dry spell. Oyster mushrooms are fast colonizers, so some folks I’ve spoken to with experience in this style of cultivation have suggested fruiting might happen as early as one month from now if conditions are right. In the Grey Dove bed, I'm seeing mycelium bursting forth from the surface, and I'm hoping to have an update on that soon. 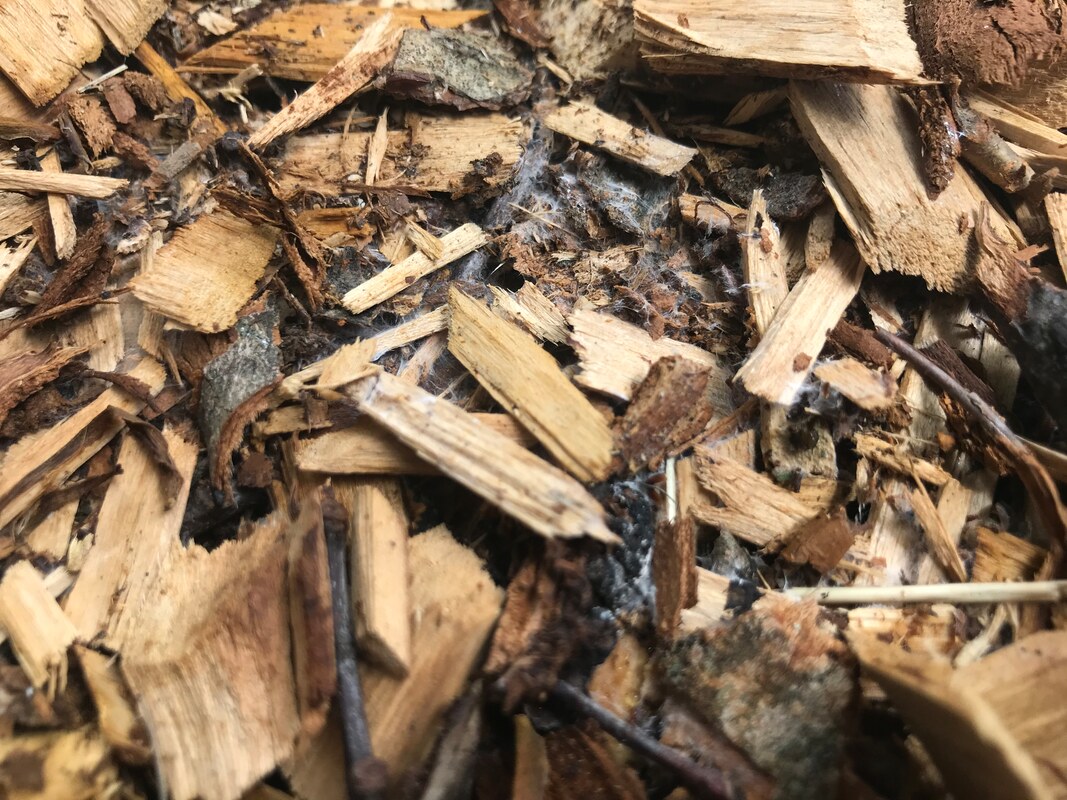  I plan to set up two beds with Winecap Stropharia spawn, which is a mushroom that is slower to colonize, but where beds are known to produce for up to 3 years. Both varieties give you the benefit of choice edible mushrooms that are documented as both safe and delicious, while helping to give you several inches of fresh soil per year. I’ve seen documentation of Stropharia patches set up amongst existing garden beds, with holes cut in cardboard for significant patches of flowers or trees. I’ve even seen setups where the beds are built with fresh wood chips but topped with finished garden mulch, if you are concerned about the appearance to the street or sidewalk. Note - if you are looking for fresh woodchips, many local arborists or tree services are more than happy to get rid of a load of freshly chipped or cut wood, at no cost to you. There’s also a service called Chip Drop which will automatically connect you to an arborist with no phone-call required. The potential downside of this is that you don’t control the amount of material you’re getting - an average small landscaping truck carries about 4 cubic yards of biomass, which takes up the ground space of a mid-sized SUV in your driveway or on your lawn as you get ready to use it - and you can end up with more! There are plenty of uses for fresh woodchips, including as mulch, in piles to attract mycelium, as part of hugelkultur (buried wood) beds - see a forthcoming guest-post. You can also use them as kindling, or coordinate with your neighbors if you have fellow gardeners or permaculture enthusiasts in your area. Second note - It is not advised to eat mushrooms that have grown in areas treated with pesticides or contaminated with heavy metals, as mushrooms are able to leach incredible amounts of contaminants from the soil. Building a raised bed may mitigate that somewhat, but given how many nutrients mushrooms draw up from the surroundings, I would advise against it. But mushrooms also demonstrate promising potential in bio-remediation, the use of particular plant, animal and fungi species specifically targeted to help recover a wounded or contaminated ecosystem. If you are trying to restore a yard that has been chemically treated over the long term, I suspect that the cultivation and encouragement of mushroom growth would only aid that restoration, providing a significant link in the food web to species at so many levels of an ecosystem.
0 Comments
I've been ruminating on perennial food plants for the past few days. I'm in charge of planting the vegetable garden at Natureworks, and guess what? I haven't done it this year. I haven't been there much, and when I am there, I don't have time. But it looks ok. That's because the rhubarb, strawberries, raspberries, and herbs that come up year after year. Perennial food plants. Sure, there are gaps where annual vegetables would usually go, but the garden looks ok and we get some harvest without doing anything.
And that's the key. Will your food plants come up without you doing anything? What if your main gardener gets hurt, or is too busy, or your annual vegetable seedlings die for some reason? You won't have vegetables. But if you base your garden around things that you plant once and will produce for years, you can be guaranteed to have some food. Perennial vegetables are built for resilience. Diverse perennial vegetables are build for extra resilience because if one of them has a bad year, the others will feed you. Just a few perennial vegetables off the top of my head: Asparagus Rhubarb Good King Henry (it's a leafy green) Turkish Rocket (another leafy green. It might reseed and become invasive? I'm not sure about this one) Many herbs Fruit trees and berry bushes Nut trees Some varieties of kale and collards will overwinter in New Haven without protection and in colder climes with row cover or plastic on them. They are excellent spring greens. Later in spring they flower and go to seed, so you attract bees and then get more seed. Cilantro and dill are not exactly perennial, but if you scatter their seeds in the fall, they will come back next year. So, though I often get dreamy about tomato varieties, this year is reminding me how important it is to focus on food plants that will come back year after year. Don't do it! Even without the Arctic Blast this weekend, it's still to early.
People get so hyped up to plant tomatoes, squash, peppers, and beans around now, but it's too darn cold. My anecdotal observations from having spent a lot of time working outdoors the past ten years is that spring is cold for longer than you expect and fall is warm for longer than you expect. I always think of May as a very warm month, but it's just not. And I think of September as chilly weather for long sleeves, but there were 80 and 90 degree days last September. So when to plant tomatoes? (And all the rest of that warm stuff) No earlier than May 15th. Memorial Day weekend is the classic time to plant tomatoes and I agree. I've planted them May 15th before, and they just sit there in the dirt until late May when they take off and grow rampantly. So it's kind of pointless to put them in May 15th, in my opinion. And when is it too late? I took home some stragglers from Natureworks and planted them in probably the third week of June. Didn't get any tomatoes, but that's because they were long-maturing varieties. If I had put in a quick-maturing 60 day tomato at that time, I think it would have been fine. So I would say you can plant tomatoes all through the first few weeks of June, but as it gets later, be careful about the variety you plant--make sure it matures quickly. |
Categories
All
Archives
August 2021
|
 RSS Feed